This section is dedicated to connection of the Access Control controllers to TRASSIR and their parameters configuration.
Important
Before connecting the controller, learn more about its setup and operation features as part of TRASSIR:
In order to connect the controller to TRASSIR go to the server settings to the Plugins -> Access Control -> Devices, press Add Controller and enter the connection parameters into the opened window.
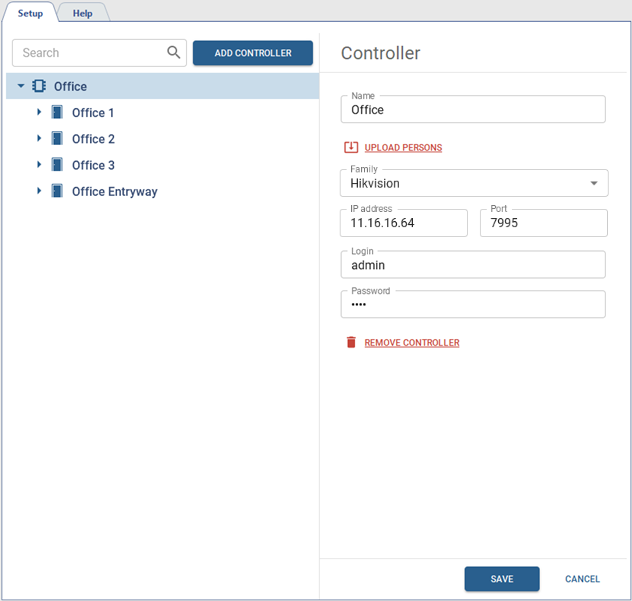
In case of the controller successful connection to TRASSIR you will see access points on the device connection page. Otherwise, the error message appears.
Tip
All persons, created in TRASSIR Access Control, are automatically uploaded to all connected controllers. Use the Upload persons link to modify data on any particular controller, if necessary.
Access points settings
The number of access points is determined by the controller technical characteristics. You need to configure them for further user of Access Control in TRASSIR.
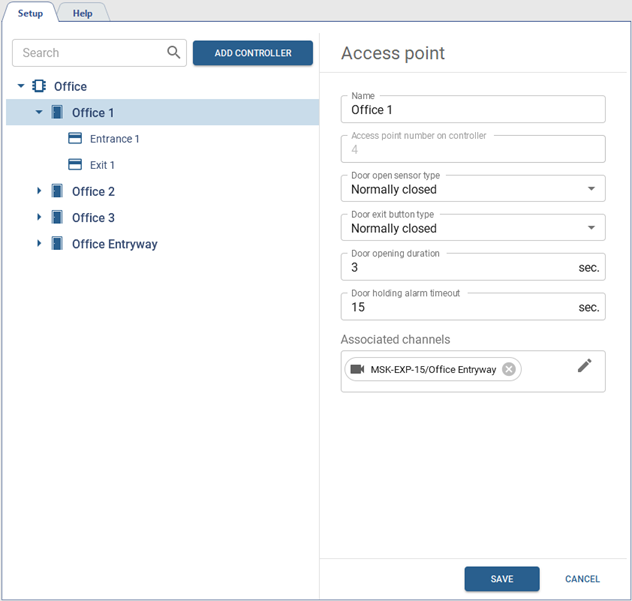
To do this, select the access point and configure the following parameters:
- Name which will be displayed in the object tree>.
- Select the door sensor state in which the door is in the closed position in the Door open sensor type.
- Select the button state the same way in the Door exit button type field.
- Set the time period within which the door lock will be unlocked in the Door opening duration field. The countdown will start immediately after the button pressing or card reading.
- The amount of time in the Door holding alarm timeout defines how long the door can be in the open state. In case upon this time expiration the door remains open, it will trigger the alarm event.
- In the Associated Channels field, select the video channels to link them to all events that will occur on this access point. When reviewing all occurred events, the video from these channels will be displayed in the TRASSIR Access Control template or on the active monitor.
Card reader settings
There are usually two readers connected to the access point, one of which can be used to provide entrance to the room and the other to exit.
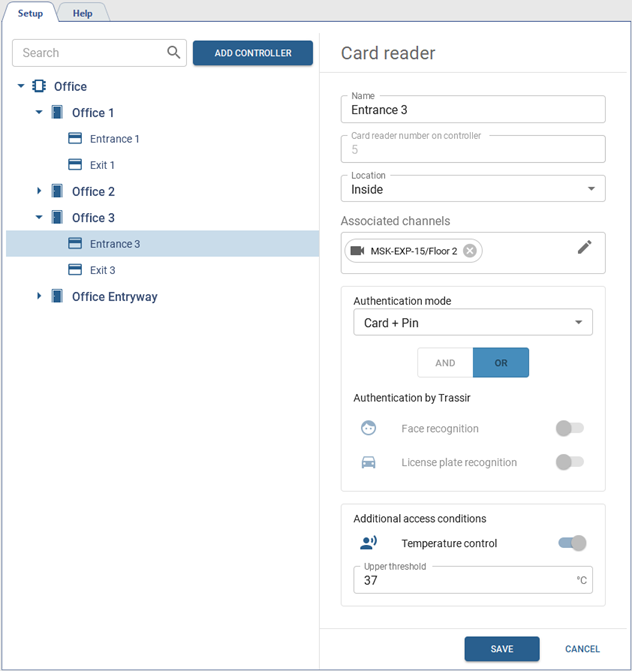
In order to set up the reader, enter its Name and select the Location. In the Authentication Mode setting, select one of the ways by which the person will verify their identity: by card, by card and pin code, by card and face, by fingerprint, etc.
Tip
The amount of the authentication modes depends on the functionality of the connected card reader.
If the TRASSIR modules will be used for authentication, enable the corresponding module in the Authentication by TRASSIR setting and specify the video channels to be used for authentication in the Associated channels field.
Tip
All modules used for authentication should be enabled and configured. Read more in: Face recognizer and AutoTRASSIR - Automated license plate recognition.
The built-in into TRASSIR Persons base will be used for face recognition.
The license plate numbers specified in personnel settings will be used for license plate recognition.
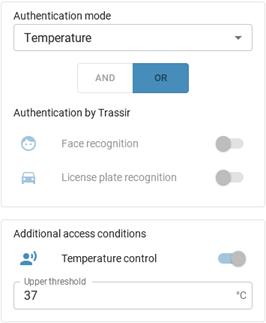
The Additional access conditions parameter lets you enable the Temperature control for persons authenticating with this card reader. In case the employee has a temperature above the value specified in the Upper threshold field, the event log will display a corresponding warning and the entry will be blocked for this person.
Tip
Select the Temperature mode in the Authentication mode setting, enable Temperature control and set the Upper threshold to make the reader operate in the thermometer mode, determining the temperature of people passing by. Other modes of authentication will not be available in this mode.